
In Today’s Issue
→ Hash algorithms differ: Not all Hash Algorithms are Created Equal
→ How to Perform Vulnerability Assessment with Nessus
→ Socket Programming with Python
→ Secret Knowledge
→ Podcasts
-Cryptography-
Hash algorithm: Not all Hash Algorithms are Created Equal
An effective hash algorithm should be able to generate a hash algorithm quickly and efficiently. In addition, it must have several other properties to provide the best security. An optimal algorithm must be able to stand the test of time, even with advances in technology.
Let’s examine some of the desired properties of an exceptional hash algorithm including non-reversibility, collision resistance, and determinism. We’ll start with the non-reversibility or one-way property.
Generating a one-way function
When we say one-way, we mean it. A variable-length block of data goes into the function, and a fixed-length hash is returned as the output. The output has no resemblance to the original block of data in any way. Nor is there any way to reconstruct the data to become the original. This non-reversible property is optimal as it makes a more secure hash algorithm. So, Hash algorithms differ!
Another property is that the algorithm must produce a fixed-size output.
Producing a fixed-size output
It doesn’t matter what the size of the input is, a hash algorithm will always produce the same size hash. The output will depend on the given algorithm and can vary. For example, a cyclic redundancy check (CRC) is a type of hash algorithm that generates a checksum that is generally used to detect errors in data transmission. You might see the following values when using a hash algorithm:
- CRC-16 produces a 16-bit checksum
- CRC-32 produces a 32-bit checksum
- MD5 produces a 128-bit hash
- SHA-224 produces a 224-bit hash
Note: A checksum is a shorter value as its purpose is to detect transmission errors. Although this value is important, it does not have as rigorous requirements as a hash value, which is used in a cryptographic function to ensure data integrity.
In addition to generating a fixed-size output, the algorithm must always return the same hash value, as discussed next.
Consistently creating the same hash
Imagine the following scenario when sending a document to someone:
- A malicious actor could intercept and make changes to the document.
- The malicious actor could then redo the message digest, and then send the document to the intended recipient.
Even though the original message digest was replaced by the malicious actor, the recipient will have the correct hash value, as the hash value was also replaced.
To protect against this type of attack, the sender should use an HMAC. That way, if a malicious actor were to intercept and change the message digest, the recipient would know that the message digest was invalid because the message digest would not be encrypted.
Ensuring collision resistance: Hash algorithms differ
Collision resistance means that it isn’t possible to have two different messages with the same hash value. Every hash algorithm has the potential for a collision. However, it’s optimal to have strong collision resistance, especially when used in cryptographic applications.
Let’s compare weak and strong collision resistance.
Weak collision resistance
With some algorithms, there may be a possibility of having two inputs that will result in the same hash value. For example, the CRC-32 algorithm was used in the Wired Equivalency Protocol (WEP). The algorithm was found to be prone to attacks, which could result in a malicious actor being able to modify the contents of a message. Algorithms that have weak collision resistance are unsuitable for cryptographic techniques.
Strong collision resistance
On the other hand, new hash algorithms approved by the National Institute of Standards and Technology (NIST) are found to have strong collision resistance. One such algorithm is Keccak (pronounced “catch-ack”), which was the winner of the SHA-3 competition. Read more here.
Hash algorithms differ: Not all hash algorithms are created equal in that there are several optimal hash properties. I hope you reviewed these properties, including the one-way nature of the algorithm in that the message digest bears no resemblance to the original text and why a hash needs to consistently create the same hash every time the algorithm is run on a block of data.
-Tutorial-
How to Perform Vulnerability Assessment with Nessus
Nessus is one of the most popular vulnerability scanners and is widely used by network and cybersecurity professionals. Nessus can help you not only identify security vulnerabilities but also provide solutions to help remediate and mitigate cyber-attacks. It also provides a vulnerability score for each security weakness which is used to help prioritize your workflow. Because new vulnerabilities are being discovered every day, using a tool like Nessus is worth having in your arsenal as it can identify over 47,000 known vulnerabilities on systems.
Getting Started
Install and initialize Nessus by using the following instructions:
1. Get an official copy of Kali Linux from https://www.kali.org/get-kali/.
2. While Nessus is a commercial product, there is a free version known as Nessus Essential which allows scanning of up to 16 addresses. Go to https://www.tenable.com/products/nessus/nessus-essentials and register for an activation code.
3. Next, head over to https://www.tenable.com/downloads/nessus where you can download the version for Kali Linux as shown below:

4. Open the Terminal and use the following commands to change your working directory to the Downloads folder:
kali@kali:~$ cd Downloads
kali@kali:~/Downloads$ ls
5. Use the dpkg tool to install Nessus on Kali Linux as shown below:
kali@kali:~/Downloads$ sudo dpkg -i Nessus-8.15.0-debian6_amd64.deb
6. Use the following commands to enable the Nessus service on Kali Linux:
kali@kali:~/Downloads$ sudo /bin/systemctl start nessusd.service
7. Open the web browser within Kali Linux and go to https://kali:8834/ to begin the setup process for Nessus. Ensure you accept the security warning displayed on the browser.
8. On the Nessus welcome page, select Nessus Essentials and click Continue.
9. On the activation window, click on Skip as you already requested an activate key in step 2.
10. Next, you will need to enter the activation code which can be found in your email inbox:

11. You will be prompted to create a user account to access Nessus. Nessus will download additional updates and plugins which may take some time. Once the installation is complete, log in to Nessus via https://kali:8834/ with your user account. On the top-right corner, click on the New Scan button as shown below:

12. The next screen will present a variety of templates to perform different types of scans. For the sake of this exercise, simply click on Advanced Scan.
13. The New Scan window will appear. Set a name, description, and a target as shown below:

14. Next, click the drop-down arrow on the Save button, then click on Launch to begin the scan. When the scan is completed, click on the scan to open the vulnerability assessment details.
15. To see a list of all the security vulnerabilities found on your target, click on the Vulnerabilities tab.

16. Click on a vulnerability to see the details and its recommended solution.
17. To generate a vulnerability report, click on Report -> PDF.
18. You can also generate an Executive Report which will provide a high-level overview of all the security vulnerabilities found during the scan. This report is good for persons who are not too interested in the technical details but want to get a piece of the overall information.
19. You can also generate a Custom Report which provides all the technical details of each security vulnerability, its description, solution, and vulnerability scoring.

Important Note: Ensure you only scan systems that you own or have legal permission to do so.
Post Credit: Glen D. Singh
-Networking-
Socket Programming with Python
The first step in learning network programming is to learn about what we call sockets. Sockets provide a fundamental mechanism for creating network-based applications, and as security professionals, you will find this useful for ethical hacking purposes (for example, using socket API to create victim and hacker parts).
Sockets are generally used in client-server communication, where one node is a client initiating a connection, while the other node is a server responding to that connection. At each end of the connection, each process, such as a network initiation program or a network responding program, will employ a socket. A socket is typically identified by an IP address concatenated with a port number.
In a typical scenario, a server usually listens on a certain port for incoming connection requests from clients. Once a client request arrives, the server accepts the request and initiates a socket connection with the client. Let’s try to understand how sockets work in Python.
Creating a socket in Python
To create a socket in Python, we can utilize the socket library. This library is part of Python’s standard package, so we don’t need to install anything.
This module can be imported by simply typing the following code:
import socketLet’s look at the API of this module in detail:
socket.socket() API
To create a socket object, we can make use of the following function, called socket(). Let’s take a look at the parameters of this method. To see what parameters are available for a function in VS Code, you can simply write the function name and then, using VS Code Intelli Sense technology (which helps you write code and helps you with suggestions), you can see what parameters are required. To access this menu, if you just put your cursor on the name of the function, a small popup will appear, indicating the parameters required by this method. If you want to see the detailed implementation of this method, you can right-click on the name of the socket function and select Go to definition. This will open a file where this method is defined. Be careful not to change anything here. If you are not using VS Code, you can read the documentation relating to the Python socket module here. The implementation of this method looks like this:
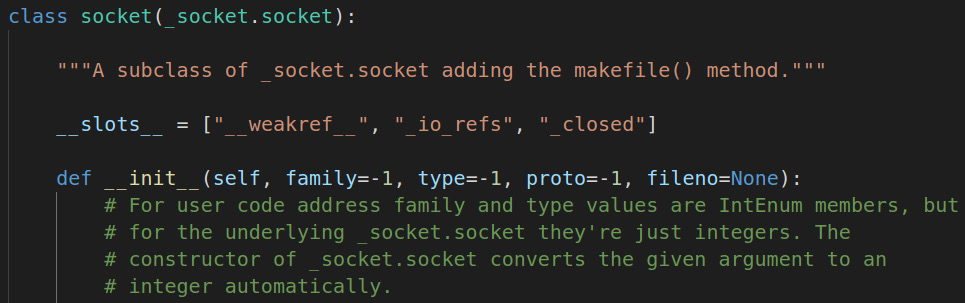
Socket is a class, and its constructor requires family, type, and proto parameters. Calling the constructor of this socket class returns a socket object that can be used to communicate with other devices.
socket.bind() API
Once you have created a socket object, to create a server, you need to bind a socket to the IP address and port that the socket will utilize for communication. Note that this function is only used when creating a server program. For servers, these must be explicitly assigned since the server has to listen for incoming connections on a specified port. In the case of a client, the IP and port are automatically assigned, so you will not use this function.
socket.listen() API
The socket.listen() method is used by servers to listen for any incoming connection as per the configuration assigned in the socket.bind() method. In other words, it waits for any connection attempt to the specified IP on the specified port. This requires a queue size for the number of connections to be held in a queue before it starts rejecting connections. For example, socket.listen(5) means that it will allow five connections at a time.
socket.accept() API
As the name indicates, the socket.accept() API accepts connections made by clients. This is a blocking function call, which means that program execution will pause here until a connection is successfully made. Once a connection is made, the execution of the program will continue.
socket.connect()
As we have seen that socket.accept() blocks execution until a client connects, the question now arises, how do clients connect? This is where socket.connect() comes into play. This method initiates a connection to the server and if a server is waiting for incoming connections, communication will follow. When a call to socket.connect() happens, socket.accept() gets unblocked in the server and execution of the program continues.
socket.send()
Once the connection is made between the server and client programs, the most important part of the program comes, which is to send data over these connections. This is where most of the user-defined logic will reside. The socket.send() method is used to send bytes over the network. Note that the input to this function is bytes, so any data you want to send over this connection should be in the form of bytes. It is the responsibility of the user to encode the appropriate data into bytes and to decode at the receiving end.
socket.recv()
This method, as the name suggests, is used to receive bytes once the user sends the data. Note that every call to the send or receive methods should be handled properly. For example, if the server is sending data, the client should be ready to receive this data and vice versa. The input to this method is the number of bytes you want to receive at once. This is the buffer created by the program to temporarily store data, and once a certain number of bytes arrive, they can be read, and the buffer is ready for the next cycle.
socket.close()
Once you have done everything you wanted to do with a program, you must close the socket so that the port can become available to other programs to be used. Note that even if you don’t close the socket properly, it will be released by your operating system after a period of time once your program exits or your computer restarts. However, it is always a good idea to close these sockets manually inside the program. If the program exits and the socket is not closed properly, any incoming requests may be blocked, or the operating system may refuse to use this socket for the next program because it may think that the port is still in use.
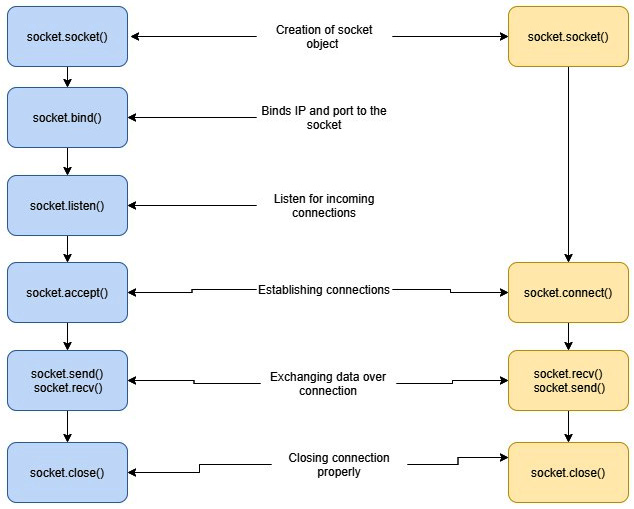
Putting it all together: Client and server socket usage in Python
Secret Knowledge
In this newly launched section, I’ll share resources, cheatsheets, hacks, one-liners, or cli/web tools (5 each) inspired by the Book of Secret Knowledge project.
Network
- PuTTY – is an SSH and telnet client, developed originally by Simon Tatham.
- Mosh – is an SSH wrapper designed to keep an SSH session alive over a volatile connection.
- Eternal Terminal – enables mouse-scrolling and tmux commands inside the SSH session.
- nmap – is a free and open-source (license) utility for network discovery and security auditing.
- zmap – is a fast single packet network scanner designed for Internet-wide network surveys.
SSL/Security
- ImmuniWeb® SSLScan – test SSL/TLS (PCI DSS, HIPAA, and NIST).
- SSL Check – scan your website for non-secure content.
- SSL Scanner – analyze website security.
- CryptCheck – test your TLS server configuration (e.g. ciphers).
- TLS Cipher Suite Search– cipher suite search engine.
Mass Scanners
- Censys – platform that helps information security practitioners discover, monitor, and analyze devices.
- Shodan – the world’s first search engine for Internet-connected devices.
- Shodan 2000 – this tool looks for randomly generated data from Shodan.
- GreyNoise – mass scanner such as Shodan and Censys.
- ZoomEye – search engine for cyberspace that lets the user find specific network components.
CVE/Exploits Databases
- CVE Mitre – list of publicly known cybersecurity vulnerabilities.
- CVE Details – CVE security vulnerability advanced database.
- Exploit DB – CVE compliant archive of public exploits and corresponding vulnerable software.
- 0day.today – exploits market provides you the possibility to buy/sell zero-day exploits.
- sploitus – the exploit and tools database.


