
How to Pentest ICS Environments
Post credit: Pascal Ackerman
ICS environments are easy targets for attackers. By design, an ICS is meant to be open in nature, easily accessible to the people working with them, and leave little in the way of barriers for systems to interconnect. This open nature often introduces common weaknesses in the system such as the following:
- Default or easily guessable passwords (if there are passwords defined at all)
- Default system configurations that allow us to easily connect to/share/access resources
- User and process privileges that allow too much system access
- Lacking or missing security controls
Additionally, because security was not a design consideration for ICS or its components, security controls such as encryption, authentication, authorization, and accounting (AAA), and logging are topically non-existent out of the box and difficult to impossible to add after the fact.
Typical risks to an ICS environment
The following risk categories can be found in most ICS environments:
- Denial of service attacks: By far the biggest risk to the ICS is denial of service (DOS) attacks (uptime and availability are the main focus of an ICS). DOS attacks are based on overloading target resources to the point where legitimate users can no longer interact with the target system. A classic example of a DOS attack is the SYN flood, where the attacker bombards the target system with so-called SYN packets – packets where the TCP SYN flag is set.
- Physical security: Physical security remains an often forgotten part of ICS (cyber)security. However, the truth is that if an attacker makes it into the ICS environment, there is no end to the harm they can do.
- Vulnerabilities in outdated OSs, software, PLC/IO/controller firmware, and the applications that run the ICS processes (think HMI/PLC programs).
- Malware: Along the lines of the previous risk category, malware is devastating to the ICS environment. Not only can malware thrive in the ICS’s unpatched network infrastructure, but it will also cause significant damage while running rampant.
- Sniffing, guessing, and cracking of passwords.
- Social engineering.
Modeling Pentests around the ICS Kill Chain
ICS environment are ideal targets for attackers with inherent risks associated with the uniqueness of the ICS environment. Because of these unique characteristics and the architecture of ICS environments, serious attackers will follow a unique approach to attack the industrial network (kill chain). Therefore it makes sense to model a pentest around this unique attack approach.
The ICS Cyber Kill Chain
Due to its unique features and deployment, ICS requires considerable knowledge about the target’s industry – the ICS environment – to be able to carry out a successful attack. These unique challenges of an industrial control system require the attacker to avoid interfering with the multitude of sensors and controls and automation devices while performing the attack.
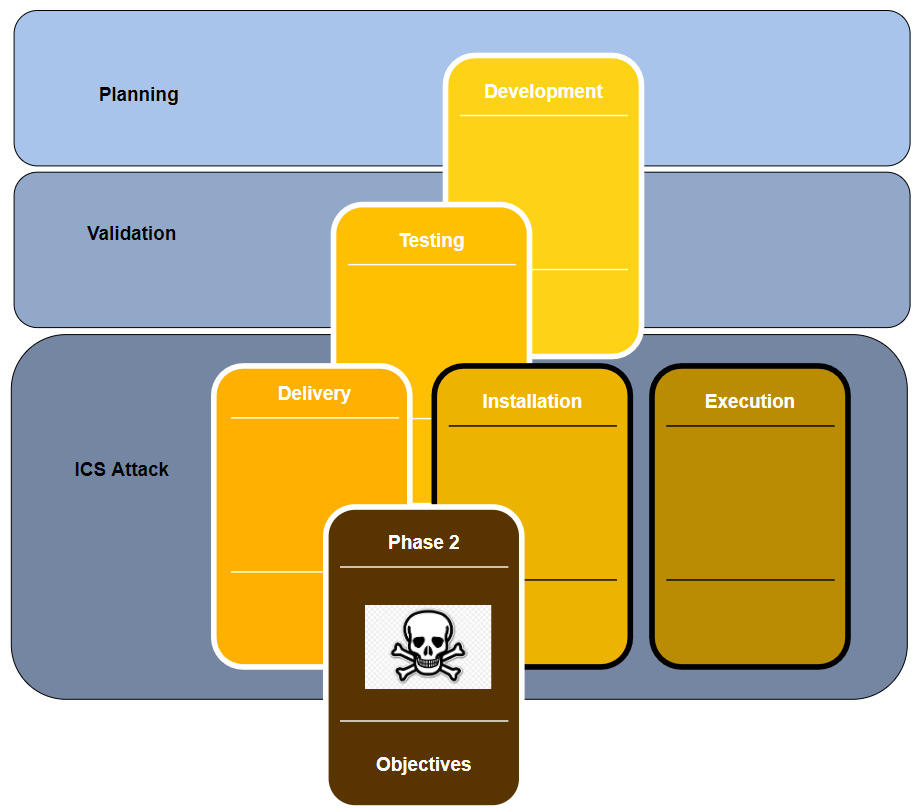
To put these unique challenges into perspective, the SANS Institute published a report that adapts the Cyber Kill Chain to industrial control system environments. This report expands upon the original Intrusion Kill Chain stages. The following diagram shows the first phase of the ICS Kill Chain:

When the attacker has successfully compromised the target, phase 1 of the ICS cyberattack is considered complete. The attack will continue with the second phase. In the second phase, the knowledge that was collected during the first phase of the attack is used to prepare the attack on the ICS environment. The following diagram shows the second phase of a typical ICS cyberattack:
You can read the complete SANS report here.
We should take extra care when performing the pentest activities in an ICS environment. At a minimum, the production process should be completely stopped, and the right people who can help recover systems and devices when things go wrong should be involved. But more ideally, we should create an approximation of the ICS environment to perform the pentest activities on, or leverage the test environment an organization has if you are lucky enough to engage a customer with the resources to run a test environment. Now, let’s get our hands dirty by completing some penetration testing activities.
How to perform an ICS-centric pentest
Just like a red team assessment, we need to prepare for the engagement. Details such as scope, timelines, allowed attack methods, and logistics such as target asset information, engagement deliverables, and any restrictions on when the pentest activities can be performed should be discussed, detailed, and written down in a contract to avoid any misconceptions.
Setting up the test environment
For this exercise, we will be setting up a test environment that covers all the systems and equipment for the entire ICS environment of (example) Company Z. The only time we will not be using this test environment is when we are performing the first step – attacking the enterprise environment of the engagement. Unless explicitly denied, a comprehensive (ICS) penetration test should reveal any vulnerabilities (and their exploitability) that can be discovered on the public IP subnet of the target.
Note: If you can, building a test setup for the target environment is always the preferred method of performing penetration testing engagements. As part of the engagement scoping work, we received the following ICS architecture drawing from Company Z:
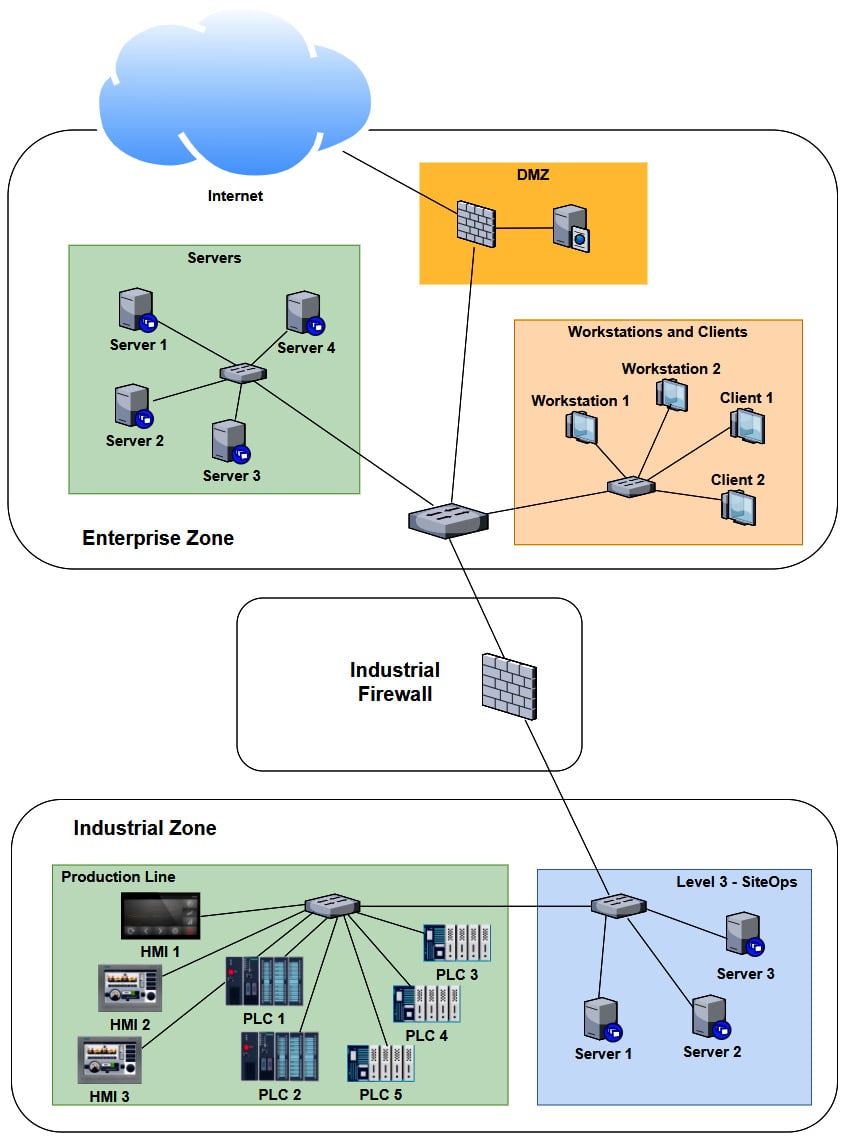
As we can see, several systems and devices are identical (or close enough for us to approximate their presence with a single system in our testbed). Now, if we combine any duplicate/similar systems, we can narrow down our testbed architecture to the following:
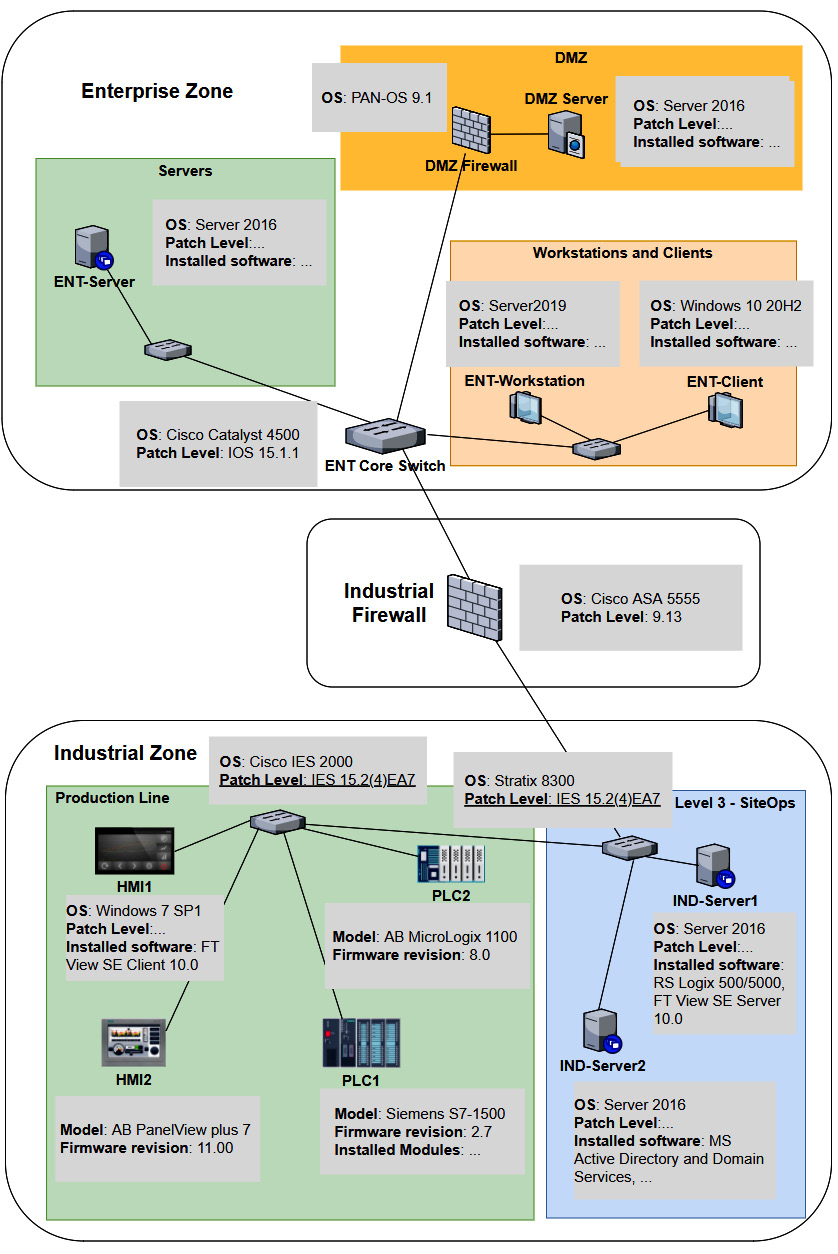
At this point, we can use a combination of physical hardware, virtualization technologies, and devices and systems found in Company Z’s spares department to create the testbed. We will install all the correct firmware for the physical devices, where possible do a physical to virtual (p2v) conversion of the workstations and servers, and simply clone (copy) the virtual machine for the OSes in place. The advantage of p2v or cloning is that we copy all the settings, users, applications, and the patch level of the workstation or server into our testbed. For switches, routers, and firewalls, we want to install the exact firmware revision and export the running config of the production system, and then apply it to our testbed.
Let’s start the pentest engagement activities by discussing attacking the enterprise environment.
Pentest engagement step 1 – attacking the enterprise environment
The first two steps of the ICS penetration testing exercise are synonymous with the first phase of the ICS Cyber Kill Chain: we want to get into the target’s industrial network. If we are lucky, this can be achieved via a shortcut such as an internet-exposed industrial control system or device. We shall explore that avenue in the next section, Shodan public subnet assessment. Often, a shortcut is not available, or the engagement specifically wants us to find a path through the enterprise network in addition to any other attack vectors. This is also the case with Company Z. They want us to find any avenue of attack, any threat vector and vulnerability we can leverage, to get into their industrial network, and that can interrupt production or steal sensitive data.
Let’s start the pentest engagement with a Shodan search for any internet-facing control systems.
Shodan public subnet assessment
Although we will not spend much time pentesting the enterprise environment in this chapter, I would like to walk you through the process of performing a Shodan assessment for your (target’s) public IP address range. As a matter of fact, performing a Shodan assessment that reveals details for your publicly exposed systems is something that should be performed regularly, to verify that you are not accidentally exposing some internal system to the outside world, with all the consequences of doing so. Follow these steps to perform a Shodan assessment for your (company’s) public IP address range:
1. First, we must find our public IP address range. For this, we must simply visit this website from a client on the company network:
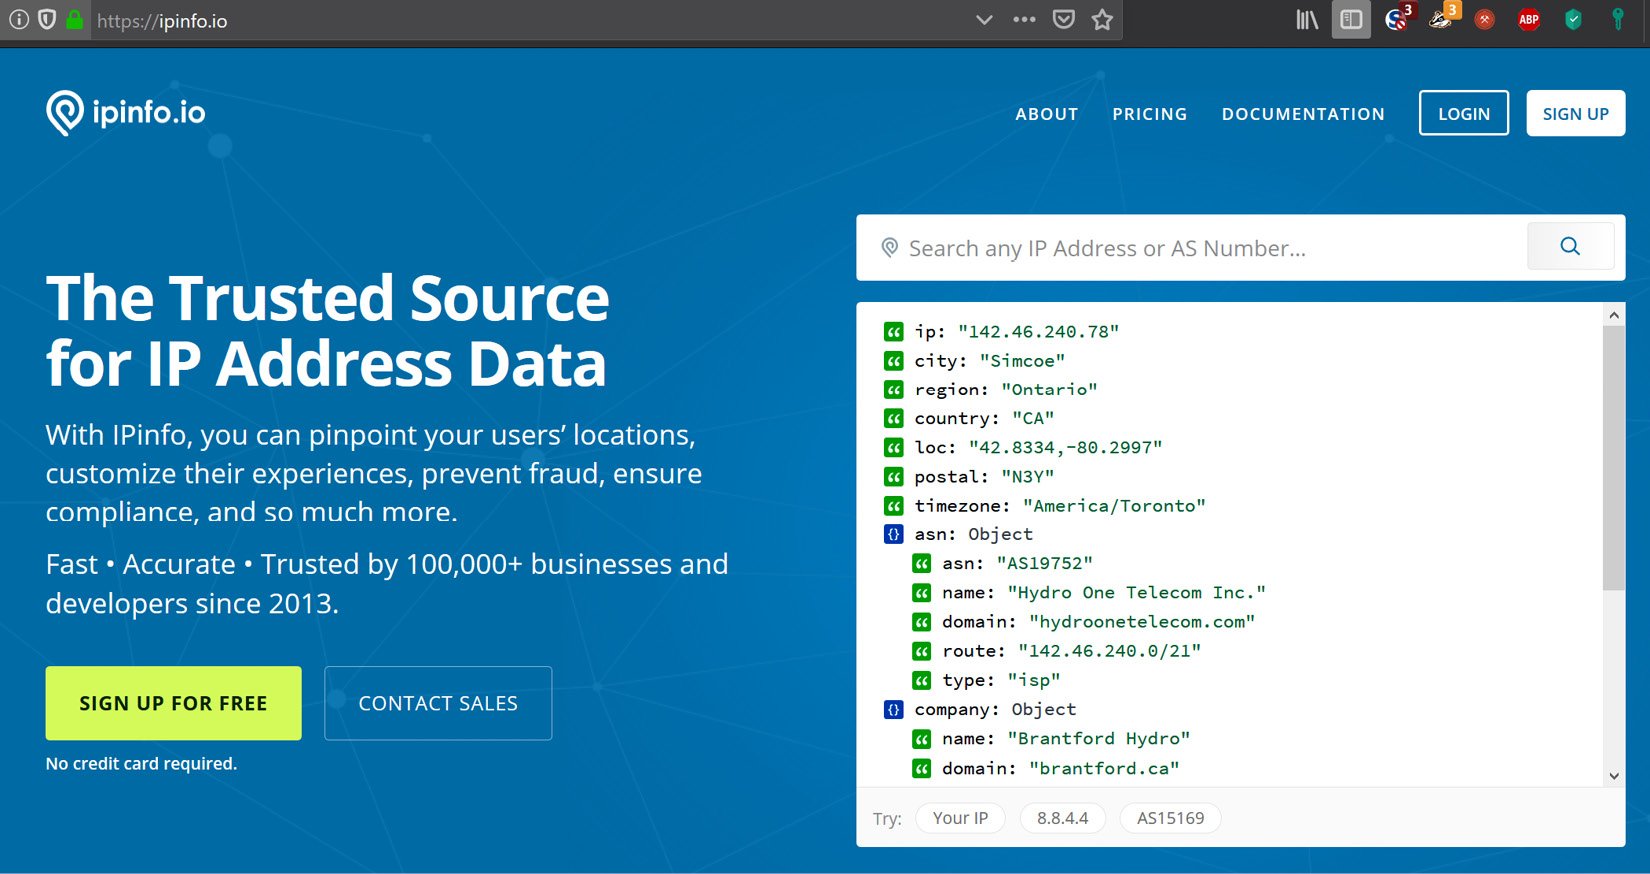
Looking up a public IP on IPinfo.io
2. The site will automatically display details about the (public) IP you are using to visit the site, with the most important part being the Autonomous System Number (ASN) route detail:
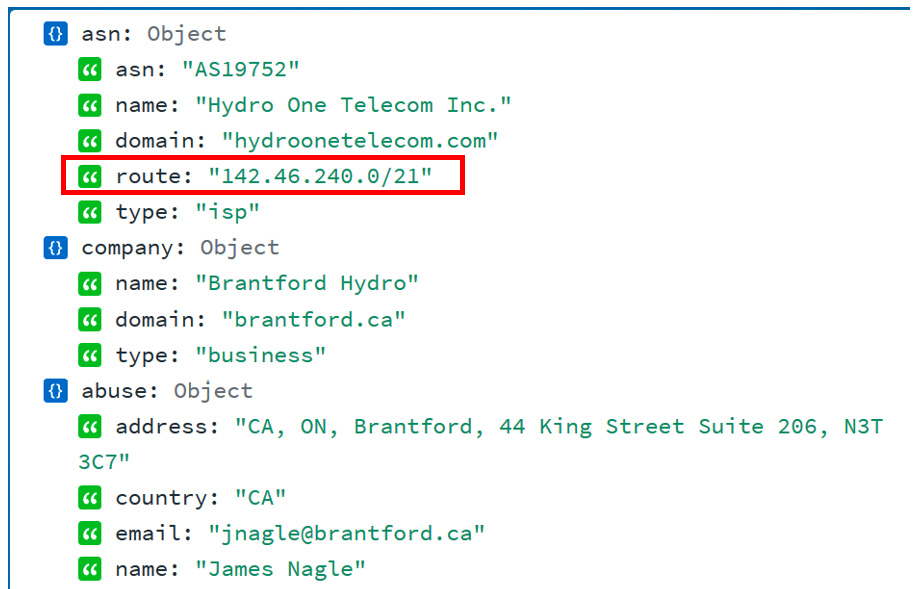
The public IP subnet range
3. The ASN route is the subnet that is assigned to your organization – the public IP address range that your organization owns. The IP address range in the preceding example is 142.46.240.0/21 (note that we chose a random IP address for this exercise, something that resulted in the information we needed for this exercise).
4. Armed with the public IP address range, let’s navigate to https://www.shodan.io and run a search for net:142.46.240.0/21 (note that you need a standard license to perform a network lookup). We will be presented with 262 results:
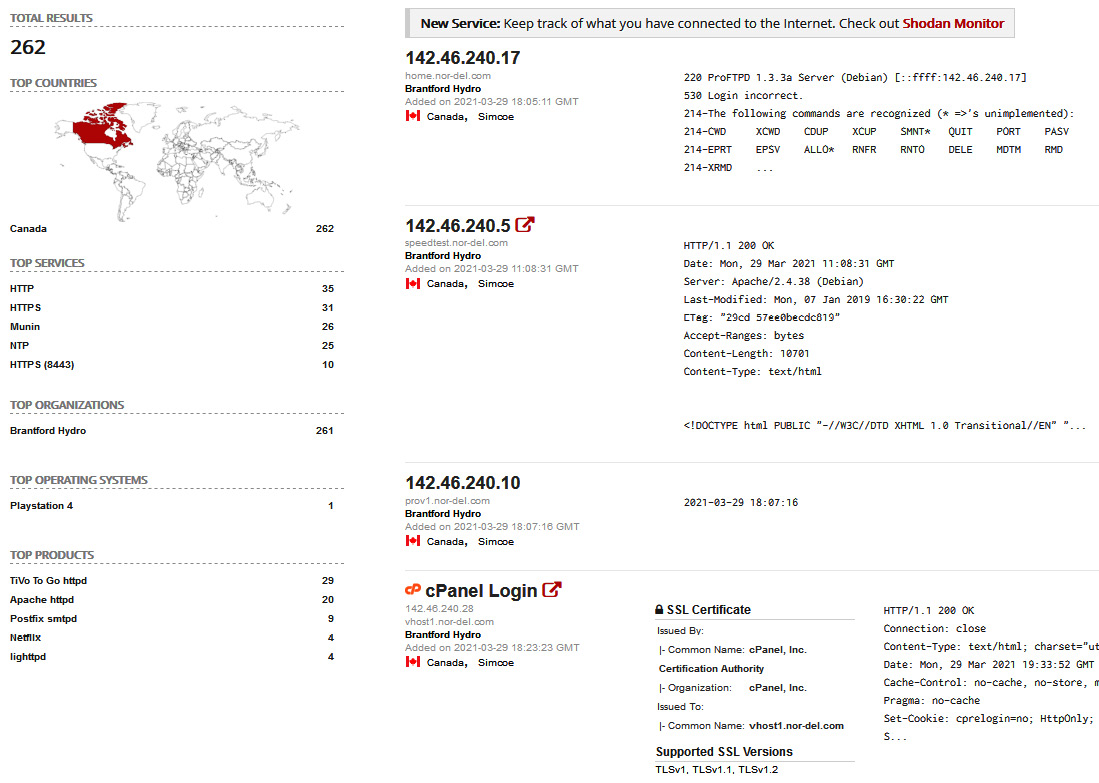
IP range lookup on Shodan
5. Most of these results will be for legitimate services that your company exposes to the internet. We want to start narrowing down the results to find any ICS systems that have been exposed. If, for example, we know we have Siemens equipment in our production facilities, we could search for net:142.46.240.0/21 siemens. In this case, this doesn’t result in any findings:
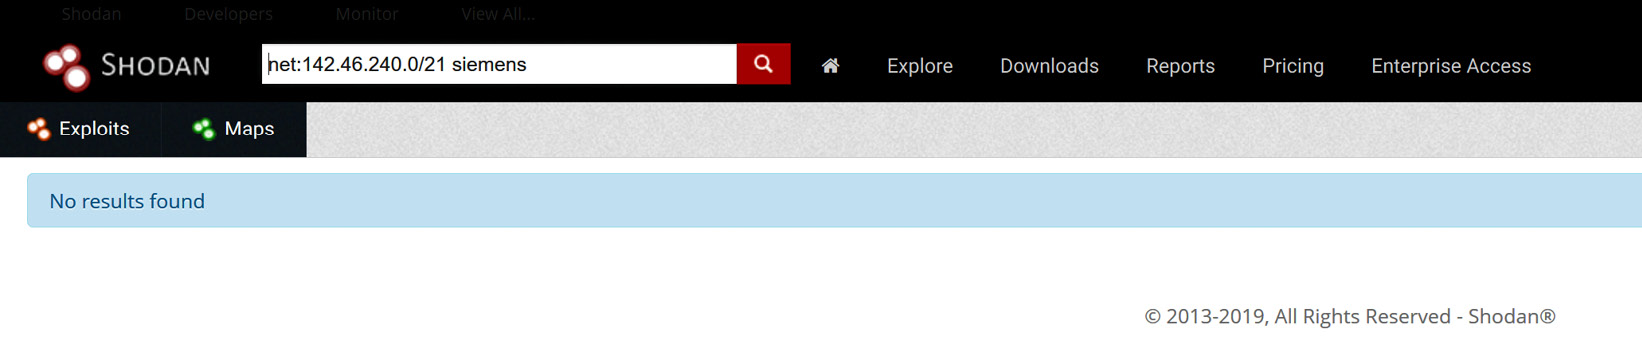
Searching for Siemens exposed systems
6. However, if we search for Rockwell with net:142.46.240.0/21 rockwell, we will see that there is a hit on a system for a 1761-NET-ENI/D a module that is directly attached to the Internet:

Searching for Rockwell exposed systems
7. We can bring up the result details for 142.46.240.78 and see that the device is exposing a web server and an Ethernet/IP service to the Internet:
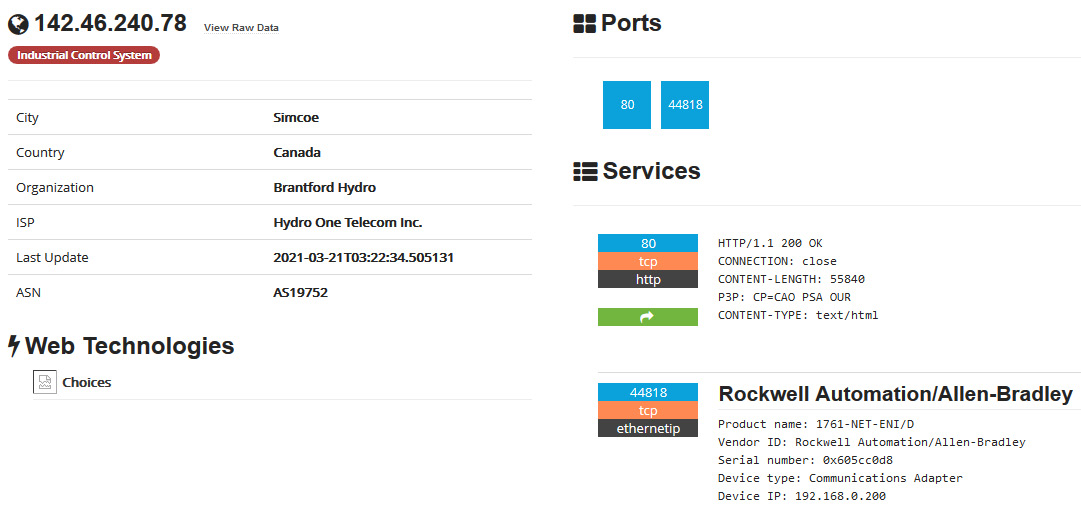
Exposed Rockwell system – details
Note that at this point, all we need to do is direct RSLogix 500/5000 to connect to the public IP address to start interacting with the exposed device, or use a Python module such as pylogix (https://github.com/dmroeder/pylogix) to start attacking the system. Finding a system that’s been exposed to the internet like this is pure luck for the attacker – there’s no need to go through the enterprise network and pivot into the industrial network; we have found a shortcut that allows us to directly access the most vulnerable part of the ICS.
Needless to say, a discovery like this warrants some serious attention, so it should be addressed as soon as possible. Next, we are going to discuss using open source intelligence (OSINT) information to perform reconnaissance on our target.
OSINT gathering
Before we can attack the enterprise environment, we need to figure out where we should hit them. Using OSINT resources and tools, we want to identify the following details for the target:
- Public IP address range (https://ipinfo.io, WHOIS records, and so on)
- Potential usernames, email addresses, employee details, and so on (WHOIS and DNS records, Facebook, Twitter, stack overflow, LinkedIn, and so on)
- Technologies in use, such as the OS, applications, services, and so on (https://www.shodan.io, https://censys.io/, https://builtwith.com/, job postings, LinkedIn posts, support site posts, and so on)
- Any other data that might help with the upcoming activities
At the end of the OSINT gathering, we should have a list of IP addresses that we can start scanning and probing.
Pentest engagement step 2 – pivoting into the industrial environment
At this point, we’ve got our initial foothold into the target network. Now, it’s time to work toward the objective of the first phase of the ICS attack: getting into the industrial network.
Scanning and probing for information and vulnerabilities
The first thing we want to do after getting a (persistent) backdoor into the enterprise network is start scanning and probing the enterprise network for information (clues) on where the best pivot point into the industrial network could be. We are interested in computer names, logged-in users, and other bits of information that can tell us a potential next target to compromise. This will put us in the position to pivot into the industrial environment. Tools that can be useful at this point include the following:
- Nmap: https://nmap.org/
- Nessus: https://www.tenable.com/products/nessus
- PowerShell:- Empire (no longer actively being developed): https://www.powershellempire.com/
- PoshC2: https://poshc2.readthedocs.io/en/latest/
- PowerSploit (no longer actively being developed): https://github.com/PowerShellMafia/PowerSploit
- Nishang: https://github.com/samratashok/nishang
- Windapsearch: https://github.com/ropnop/windapsearch
The following is a quick example of using Windapsearch to find all the domain computers using a non-privileged user account:
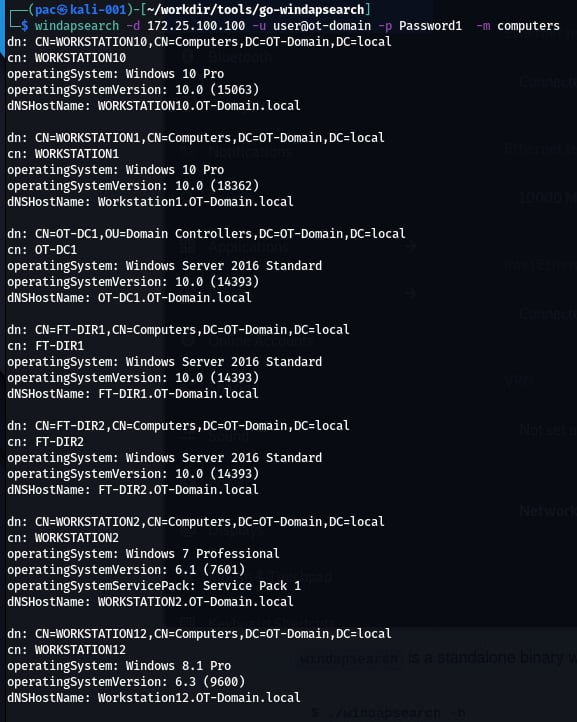
The same can be done for domain users, DNS names, groups, domain admins, and so on.
Once we’ve found a target system that will suit our needs, we can compromise it and move into position.
Laterally moving into the pivot system
Now, it’s time to compromise the system we identified. It will probably allow us to pivot into the industrial network. There are various ways to accomplish this, such as by using exploitation tools/frameworks or leveraging living off-the-land tools (PowerShell, WMI, and so on), or even using social engineering tricks.
Tools that can be useful at this point include the following:
- Kerbrute: https://github.com/ropnop/kerbrute
- Responder: https://github.com/SpiderLabs/Responder
- Metasploit: https://www.metasploit.com/
- CrackMapExec: https://github.com/byt3bl33d3r/CrackMapExec
- The Social-Engineer Toolkit: https://github.com/trustedsec/social-engineer-toolkit
- PoshC2 or Empire (or other command and control frameworks)
Since we are performing a penetration test and stealth or aggressiveness are no limiting factors, we can go all out here. Once we are in place for the pivot, we can set up the implant in the industrial environment.
Setting up a persistent pivot implant in the industrial network
Once we are on a system that allows us to connect from the enterprise to the industrial network, we can use existing permissions (stored credentials) from that system to interact with a system on the industrial network, and then deploy an implant/backdoor. This allows us to directly access the industrial environment that’s been brokered/tunneled through the enterprise pivot system. If existing privileges are not present or don’t work, we could try to use the pivot system to attack systems on the industrial network.
Pentest engagement step 3 – attacking the industrial environment
At this point, we have a (persistent) foothold into the industrial network of Company Z. We successfully compromised the IND-Server1 which is used for remote desktop virtual host sessions by the engineers of Company Z. We set up a tunnel from a Kali Linux machine to this compromised IND-Server1 so that we have free reign over attacking the industrial systems and devices.
We will start with interrogating the network equipment. Note that from this point on, we will be strictly performing our scanning, probing, and attacks on the testbed we built for this pentest engagement.
Testing the network
The first area we will be concentrating on is the switching and routing gear present in the industrial network.
Scanning switching and routing
Scanning switching and routing gear isn’t much different from scanning workstations and servers. Tools such as Nmap and Nessus have a variety of plugins and scripts for interrogating networking equipment.
Using Nessus
The following is the output from an advanced Nessus scan that’s been performed on the two industrial switches (172.25.100.253,254):
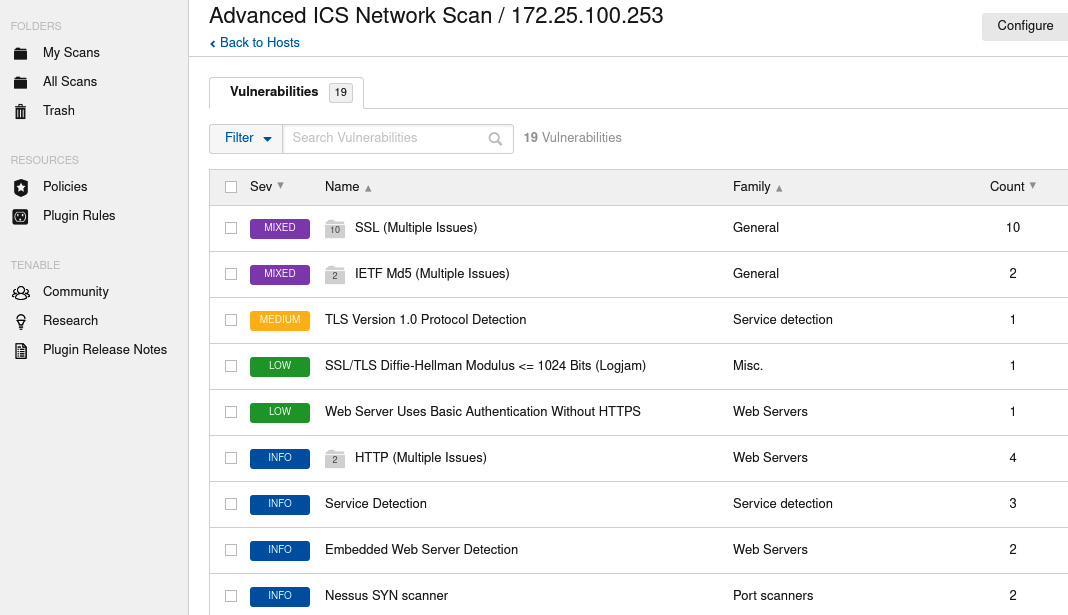
Nessus scan result for the IND switch
We can use this information to find exploits for the switches on online vulnerability and exploit databases.
There are many more tools that can find information about specific devices/brands; it helps tailor your pentest toolkit to the job at hand. For example, the next section will introduce a handy tool for getting information out of Cisco Networks called Cisco Torch.
Using Cisco Torch
If we are dealing with Cisco environments, a tool that helps identify and characterize Cisco gear is cisco-torch. The tool doesn’t come pre-installed with Kali Linux but can easily be added with the following command:
sudo apt install cisco-torch
Here is an example run of the tool:
cisco-torch -A 172.25.100.254
Using config file torch.conf…
Loading include and plugin …
# Cisco Torch Mass Scanner #
List of targets contains 1 host(s)
8853: Checking 172.25.100.254 …
…
* Cisco by SNMP found ***
*System Description: Cisco Internetwork OS Software
IOS ™ IES 2000 Software Version 15.2(4), RELEASE SOFTWARE (EA7)
…
Cisco-IOS Webserver found
HTTP/1.1 401 Unauthorized
Date: Tue, 13 Apr 2020 00:57:07 GMT
Server: cisco-IES
Accept-Ranges: none
WWW-Authenticate: Basic realm=”level_15_access”
…
401 Unauthorized
…
As you can see, cisco-torch can gather some relevant data on the network device we pointed it at. We can take that information and look up any existing exploits: Searchsploit results for the discovered IOS version
Testing Level 3 Site Operations
L3 SiteOps is where the industrial servers and workstations tend to live, so we will be looking at finding vulnerabilities in those types of systems.
L3 SiteOps is often a valuable target for ICS attackers as this part of the environment hosts the databases for the ICS (targets for data exfiltration attacks), as well as the workstations and servers that have the programming and configuration software, including the ICS equipment applications that the ICS environment runs on.
Note: This post offers a light overview of the many facets of conducting OT-centric penetrating testing engagements. If you are interested in building an in-depth understanding of ICS pentesting activities, I’d highly recommend reading Chapter 17 of Industrial Cybersecurity – Second Edition written by Pascal Ackerman.


