
SecPro #06: The Malware Analysis Super Issue!
Hey,
Welcome to yet another issue of the SecPro by Packt! I’m calling it a “Malware Analysis super issue” for two reasons: this edition is an explainer series focused on developing skills in one security topic at a time. The other reason is that while parsing the survey responses, malware analysis stood out as an important challenge area!
I hope through this issue, you’re able to build an understanding of malicious behavior in software and put some of this to practice to sharpen your skills about adversarial software.
Special thanks to the hundreds of members who have joined us since we started this program. I promise you the next act is going to be even better than the last.
Malware Analysis: Tools and Tricks for (Ninja) Analysts
Observing how malware behaves within a real-world OS can inform analysts how to better defend and remediate infections of the same kind we come across.
Malware can be slippery, difficult to dissect, and prone to escapism. For simplicity, let’s divide malware analysis into two: static analysis covers everything that can be gleaned from a sample without actually loading the program. And dynamic analysis, in which the malware is actually executed and observed on the system.
Before you follow the steps in this article, please a make note of the following technical requirements:
- FLARE VM setup. Follow the instructions here by FireEye to get started with this Windows Malware Analysis Distro.
- An internet connection.
- The malware sample pack here.
[Note: Parts of this article were curated using Dylan Barker’s Malware Analysis Techniques published by Packt.]
We’ll leverage several tools suited for both static and dynamic malware analysis. We’ll also review basic techniques and look at real-world examples of malware, and show how these tools can be utilized practically to both understand and defeat adversarial software. So let’s get started!
Static Analysis
One of the most useful techniques an analyst has at their disposal is hashing. A hashing algorithm is a one-way function that generates a unique checksum for every file, much like a fingerprint of the file. The following table outlines hashing algorithms and their corresponding bits:

How to Obtain File Hashes
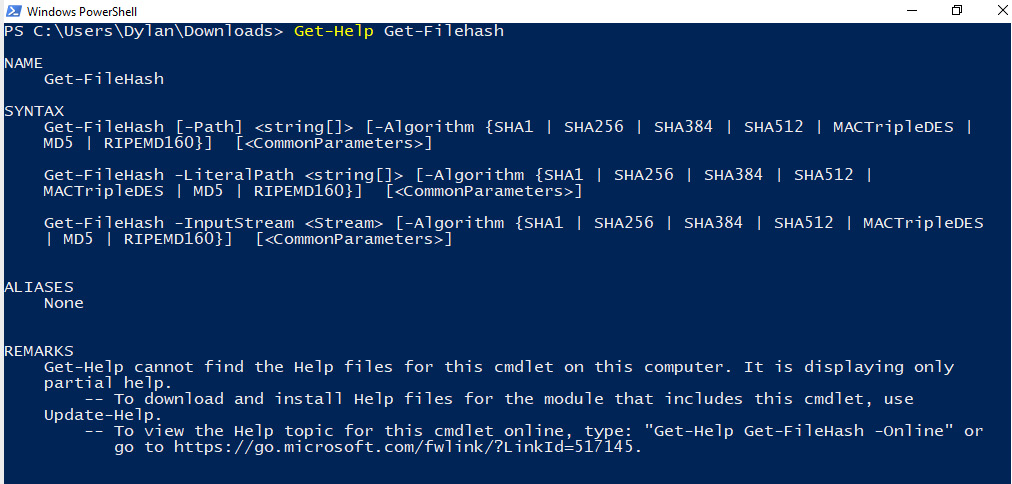
There are many different tools that can be utilized to obtain hashes of files, but the simplest, and often most useful, is built into Windows PowerShell. Get-FileHash is a command we can utilize that does exactly what it says—gets the hash of the file it is provided. We can view the usage of the cmdlet by typing Get-Help Get-FileHash, as shown in the following screenshot:
In this instance, there are two files available here. These files are titled md5-1.exe and md5-2.exe. Once downloaded, Get-FileHash can be utilized on them, as shown in the next screenshot. In this instance, because there were only two files in the directory, it was possible to use Get-ChildItem and pipe the output to Get-FileHash, as it accepts input from pipeline items.
In the following screenshot, we can see that the files have the same MD5 hash! However, they also have the same size, so it’s possible that these are, in fact, the same file:

However, because MD5 is known to be broken, it may be best to utilize a different algorithm. Let’s try again, this time with SHA256, as illustrated in the following screenshot:

The SHA256 hashes differ! This indicates without a doubt that these files, while the same size and with the same MD5 hash, are not the same file, and demonstrates the importance of choosing a strong one-way hashing algorithm.
How to Leverage VirusTotal
VirusTotal is a scanning engine that scans possible malware samples against several AV engines and reports their findings. In addition to this functionality, it maintains a database that is free to search by hash.
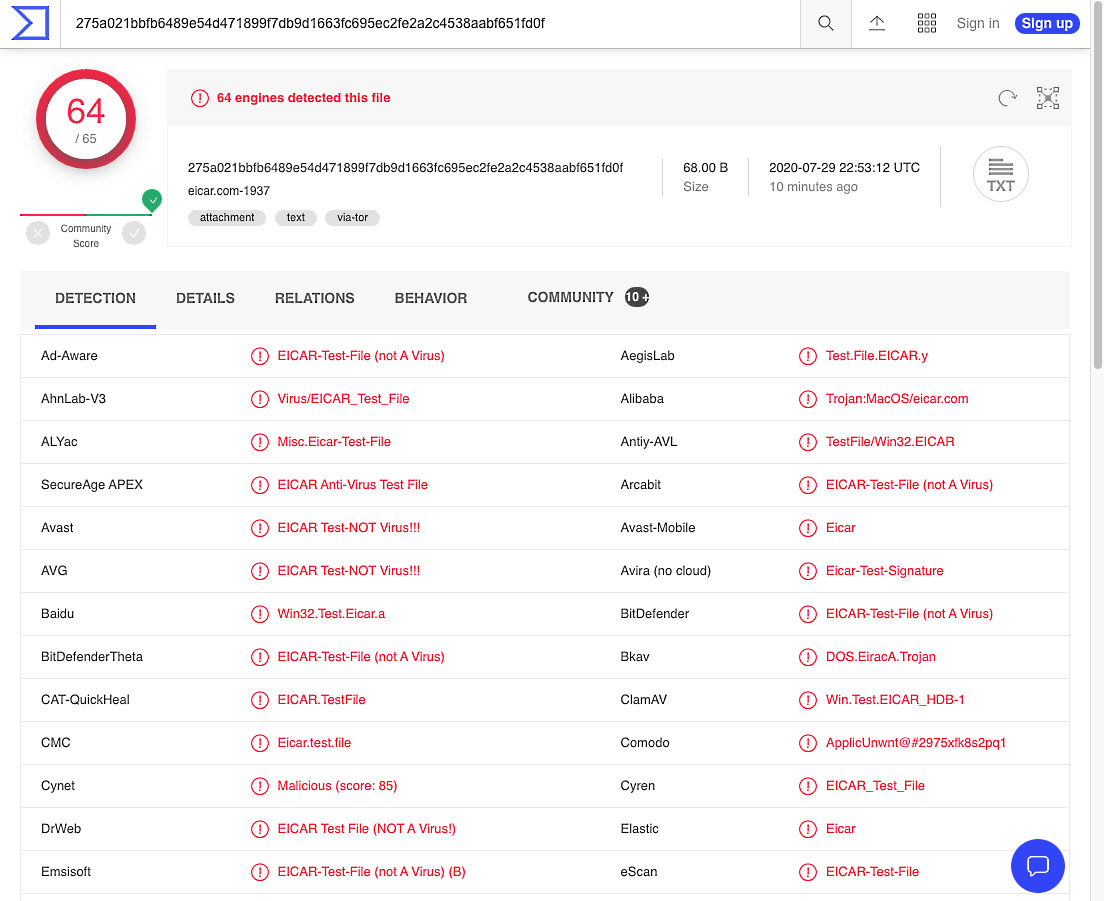
In this instance, we’ll use as an example a 275a021bbfb6489e54d471899f7db9d1 663fc695ec2fe2a2c4538aabf651fd0f SHA256 hash. Entering this hash into VirusTotal and clicking the Search button will yield results as shown in the following screenshot because several thousand analysts have submitted this file previously:
WARNING! 888888.png is live malware—a sample of the Qakbot (QBot) banking Trojan threat. Handle this sample with care!
Utilizing the previous section’s lesson, obtain a hash of the Qakbot file provided. Once done, paste the discovered hash into VirusTotal and click the search icon, as illustrated in the following screenshot:

Searching for the Qakbot hash yields no results! Unfortunately, it appears as though static cryptographic hashing algorithms will be of no use to our analysis and attribution of this file. This is becoming more common due to adversaries’ implementation of hashbusting, which ensures each malware sample has a different static hash! (Hashbusting is quickly becoming a common technique among more advanced malware authors, such as the actor behind the EMOTET threat.)
How to Fuzzy Hash with ssdeep
ssdeep is a fuzzy hashing algorithm that utilizes a similarity digest in order to create and output representations of files in the following format:
chunksize:chunk:double_chunk
A key point to differentiate ssdeep and fuzzy hashing from standard cryptographic hashing methods such as MD5 and SHA256: changing small portions of a file will not significantly change the ssdeep hash of the file, whereas changing one bit will entirely change the cryptographic hash.
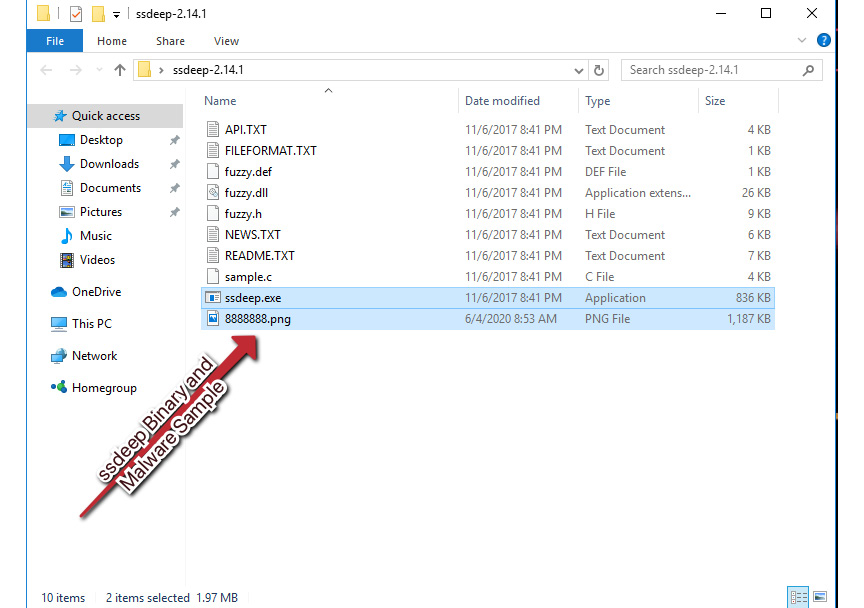
With this in mind, let’s take a ssdeep hash of our 8888888.png sample. Unfortunately, ssdeep is not installed by default in FLARE VM, so we will require a secondary package. This can be downloaded here. Once the ssdeep binaries have been extracted to a folder, place the malware sample in the same folder, as shown in the following screenshot:
Next, we’ll need to open a PowerShell window to this path. There’s a quick way to do this in Windows—click in the path bar of Explorer, type powershell.exe, strike Enter, and Windows will helpfully open a PowerShell prompt at the current path!
With PowerShell open at the current prompt, we can now utilize the following to obtain our ssdeep hash: .ssdeep.exe .8888888.png. This will then return the ssdeep fuzzy hash for our malware sample, as illustrated in the following screenshot:
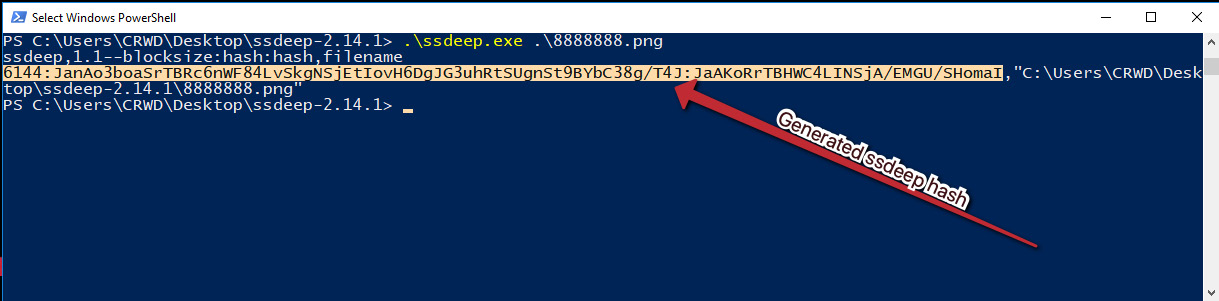
We can see that in this instance, the following fuzzy hash has been returned:
6144:JanAo3boaSrTBRc6nWF84LvSkgNSjEtIovH6DgJG3uhRtSUgnSt9BYbC 38g/T4J:JaAKoRrTBHWC4LINSjA/EMGU/ShomaI
Unfortunately, at this time, the only reliable publicly available search engine for ssdeep hashes is VirusTotal, which requires an Enterprise membership. However, we’ll walk through the process of searching VirusTotal for fuzzy hashes. In the VirusTotal Enterprise home page, ssdeep hashes can be searched with the following:
ssdeep:”<ssdeephashhere>”
Because comparing fuzzy hashes requires more computational power than searching rows for fixed, matching cryptographic hashes, VirusTotal will take a few moments to load the results. However, once it does, you will be presented with the page shown in the following screenshot, containing a wealth of information, including a corresponding cryptographic hash, when the sample was seen, and engines detecting the file, which will assist with attribution:
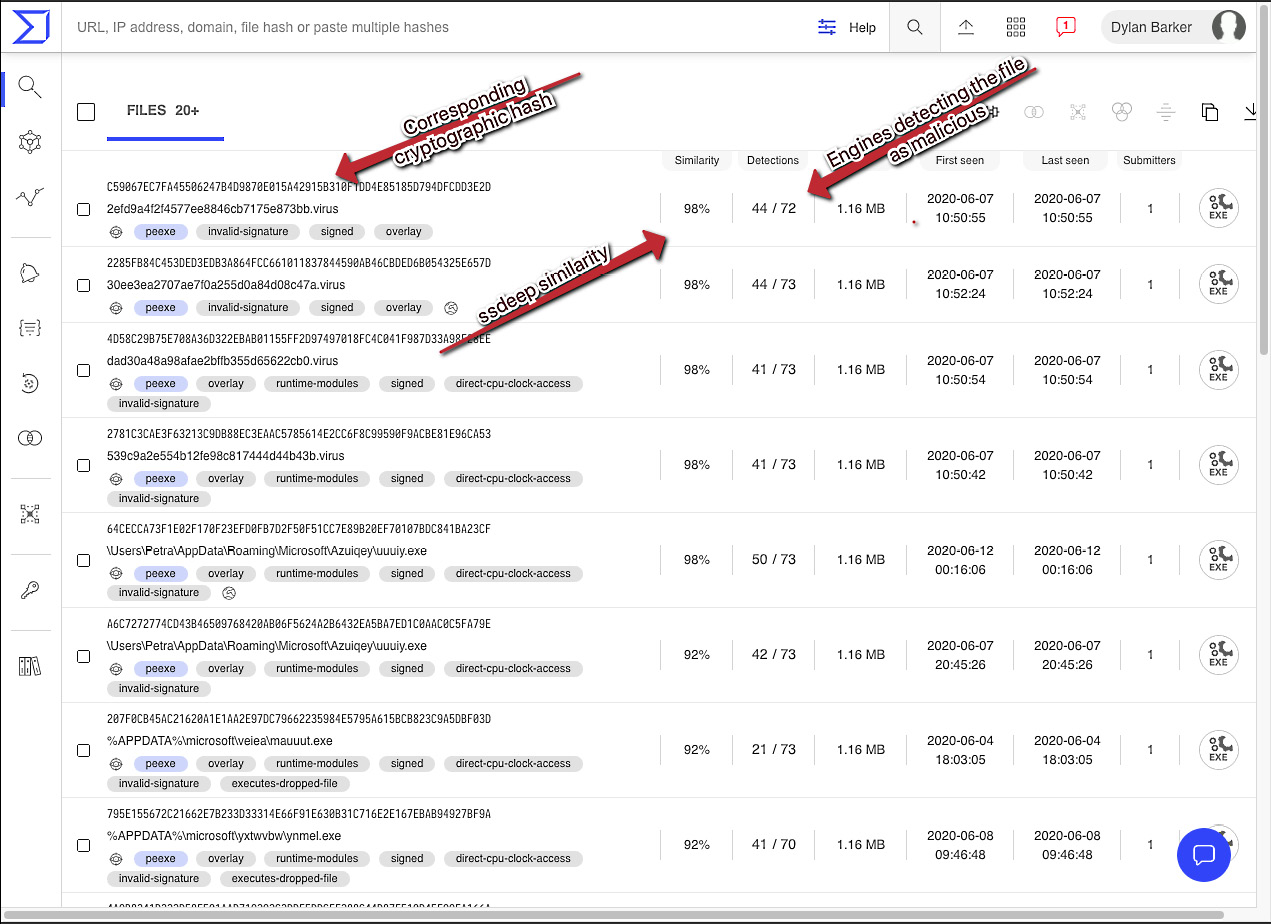
Clicking one of the highly similar cryptographic hashes will load the VirusTotal scan results for the sample and show what our sample likely is. If you do not have a VirusTotal Enterprise subscription, all is not lost in terms of fuzzy hashing, however. It is possible to build your own database or compare known samples of malware to the fuzzy hashes of new samples. For full usage of ssdeep, see their project page at https://ssdeep-project.github.io/ssdeep/usage.html.
These were basic, but powerful techniques and comprise a base skillset required to be effective as a malware analyst. Now let’s move on from basic static analysis to dynamic analysis—actually executing our malware!
Dynamic Analysis
The most powerful tool in our arsenal as malware analysts is being able to execute the malware and watch for the behaviors that the software exhibits, as well as what techniques the adversary is utilizing to achieve their goals.
While static analysis is invaluable in the sense that it can provide the equivalent of OSINT (Open-Source Intelligence) regarding a sample, it becomes a bit harder for the adversary to hide their intentions when taking action on the objective – when their software is executed.
Dynamic analysis techniques and tooling will allow us to identify the actions taken by the adversarial software on the machine. It allows us to ascertain more about how the malware works – and perhaps what the author’s goals are.
How to Monitor for Processes
In executing malware, it’s important to realize that the binary file or scripted malware dropper that we are presented with as an initial vector of infection is rarely all there is to see. Often, the malware will create additional processes or executables that are not necessarily immediately apparent to the end user. Malware, as a rule, often performs many tasks that are invisible to the targeted user unless you are actively looking for these actions.
To this end, there are several tools that are conducive to discovering these actions. The first tool we will examine is ProcWatch, a tool included in FLARE. ProcWatch has a simple and intuitive interface. ProcWatch will monitor for new processes as they execute on the system, and will inform us of their command-line arguments, as well as the user that ran them, and the start and end time of the processes. Let’s take a look at a sample piece of malware – an Emotet malicious document:
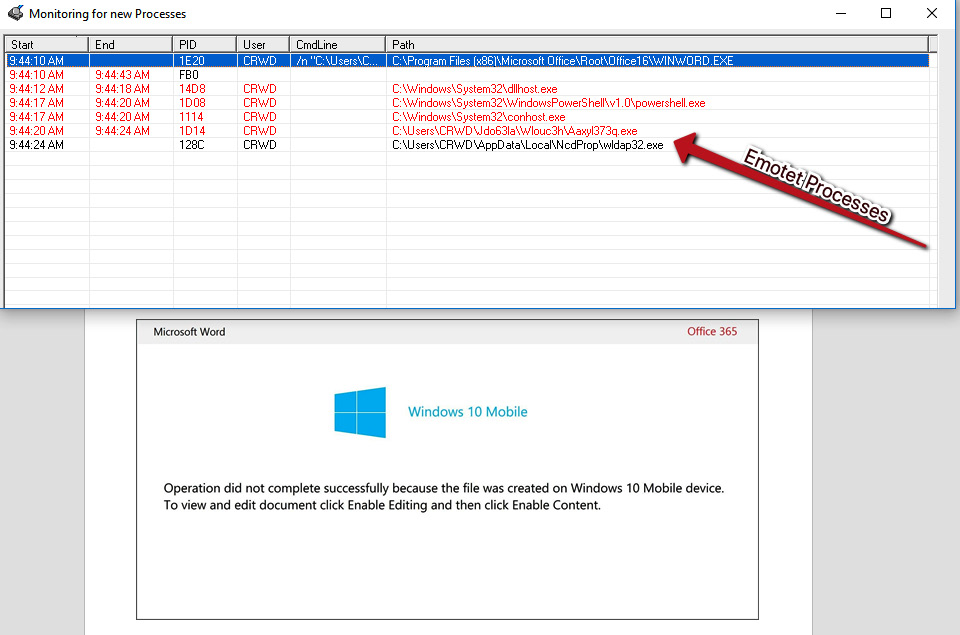
After enabling macros, we can see several processes running that appear quite suspicious when compared to local Windows processes. If we navigate to the folder shown, %LOCALAPPDATANcdProp, we can take an SHA256 of the binary by right-clicking and utilizing the HashMyFiles menu option:

Utilizing VirusTotal static analysis and intelligence techniques, we can assess with confidence that the threat is indeed Emotet!
How to Monitor for Network IOCs (Indicators of Compromise)
In addition to monitoring for processes spawned by malware, we can also monitor for outbound network connections via WireShark, to reveal valuable additional information about the attacker’s command and control servers. Once Wireshark is open, we can begin a packet capture by simply double-clicking our primary network interface, in this case, Ethernet0. After doing so, we’ll once again execute our Emotet document sample and begin parsing our captured network traffic for IOCs.
Once we have stopped our traffic capture, we can begin parsing the capture for suspicious traffic. A good starting place is often HTTP traffic, as threat actors will often use this for command and control in an attempt to sneak past the firewall in the existing, normal web traffic noise:
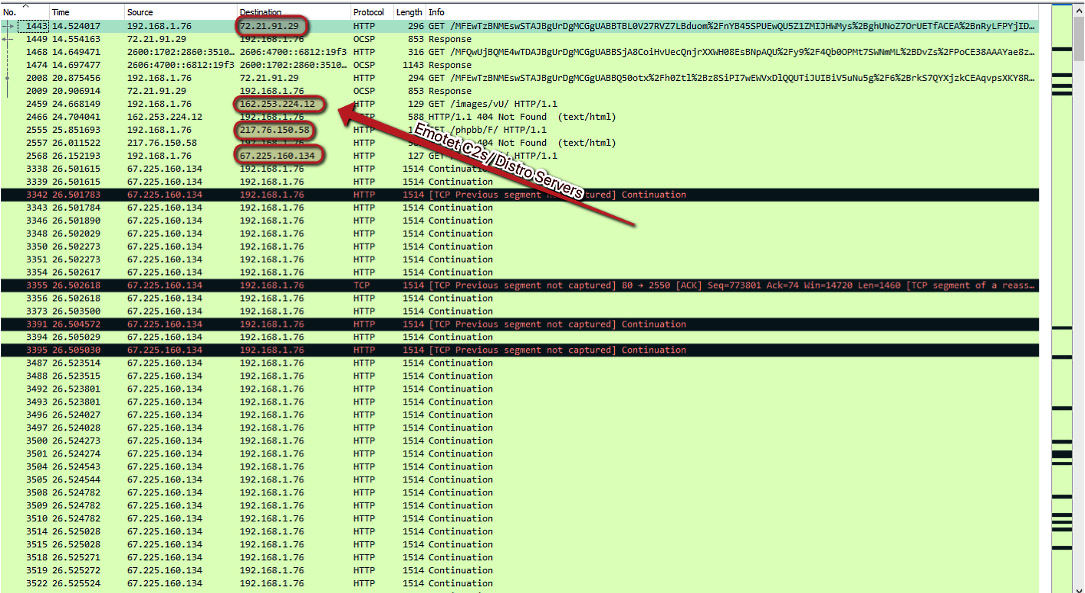
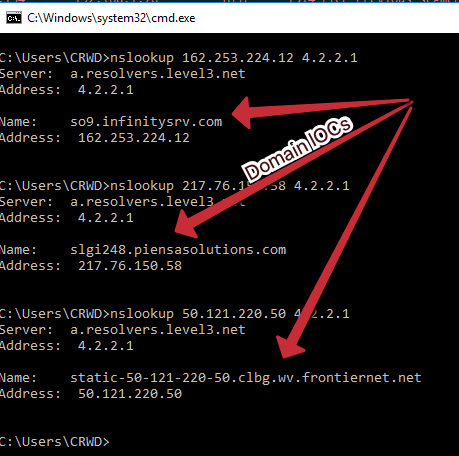
As you can see, we have several IP addresses that are responsible for command and control of the Emotet threat, as well as servers that appear to be responsible for distribution of the malware. Not only can we utilize these IP addresses to monitor and block outbound connections, but we can also utilize reverse DNS to obtain the associated domains and block those in case they are multihomed:
Wrap Up
We’ve now come to the end of this article and I hope you were able to dive into what malware analysis is about and learned the basics of watching processes, network connections, and learned what adversarial behavior looks like.
Malware Analysis Resources
Popular Tools
Wireshark
Wireshark is the de facto tool for capturing and analyzing network traffic. Wireshark allows deep packet inspection of multiple protocols at multiple layers. While analyzing packet captures in Wireshark it is even possible to extract files from the pcap that have been downloaded by the malware.
Fiddler
Fiddler acts as a web proxy server allowing traffic to be captured and analyzed. This can prove useful when analyzing a malicious document that incorporates macros to download a malicious payload, running fiddler allows a malware analyst to identify the domains that are hardcoded into the document and will be used to download the hosted malware.
Ghidra
Ghidra was developed by the National Security Agency (NSA) and is what’s known as a disassembler rather than a debugger. Using Ghidra you are able to navigate the assembly code functions like in x64dbg, however, the key difference is that the code is not executed, it is disassembled so that it can be statically analyzed.
Process Hacker
Process Hacker allows a malware analyst to see what processes are running on a device. This can be useful when detonating a piece of malware to see what new processes are created by the malware and where these are being run from on disk. Malware will often try to hide by copying itself to a new location and then renaming itself, Process Hacker will display this activity occurring making it easy to identify how the malware is attempting to hide.
ProcMon
ProcMon is a powerful tool from Microsoft which records live filesystem activity such as process creations and registry changes. This is really handy when used in tandem with Process Hacker as a new process may be created and then quickly killed, this process can then be reviewed in the ProcMon capture. Using the prebuilt filters or process tree an analyst can quickly identify what processes were created, where the executable was run from, and the parent/child dependencies.
Cuckoo Sandbox
Cuckoo Sandbox is a tool for automating malware analysis. It’s a great tool to have within an organization when you have an incident that involves malware. You can perform your own analysis as this allows me to gather as much information as possible from a malware sample.
New Tool(s)
rpetrich/patrolaroid
Patrolaroid built by Ryan Petrich and Kelly Shortridge is a malware scanner that snapshots AWS instances and buckets to uncover malware, backdoors, cryptominers, toolkits, and other attacker tomfoolery. Software engineers, security engineers, and cloud administrators only need familiarity with YARA and the AWS Management Console to use it.
Cheatsheet
A useful PDF cheat sheet by Lenny Zeltser (of SANS) that presents tips for analyzing and reverse-engineering malware. It outlines the steps for performing behavioral and code-level analysis of malicious software.
The Malware Radar
CLOP Ransomware
- CLOP members hail from a group of Threat Actors (TA) known as “TA505,” which MITRE‘s ATT&CK database says is a financially motivated cybercrime group. Read more on Krebs.
- CLOP targets include University of California, Indiabulls Financial Services, Software AG, Shell, Symrise AG.
- Malwarebytes Detection: Ransom.Clop
Ryuk Ransomware
- Ryuk tops the list of the most dangerous ransomware attacks. In the CrowdStrike 2020 Global Threat Report, Ryuk accounted for three of the top 10 largest ransom demands of the year. This article from TrendMicro examines historical Ryuk attacks and their practice of targeting large companies “big game hunting” (BGH).
- Ryuk targets include Steelcase, United States, New Orleans, North Carolina, Louisiana.
- Malwarebytes Detection: Ransom.Ryuk
Conti Ransomware
- The Conti gang is one of a number of ransomware groups that have been making life difficult lately for organizations across the globe and even causing serious disruption to global markets.
- Conti targets include Advantech, FreePBX, United States, Health Service Executive.
- Malwarebytes Detection: Ransom.Conti
The SecPro is a weekly security newsletter to help you stay sharp and upgrade your skills with trending threat insights, practical tutorials, hands-on labs, and useful resources. Build skills in as little as 10 minutes.


